Final Reflection

When I started Cool Tools this year I was not really sure what direction I wanted to go in. However, I took the road less traveled for myself. I started several things and decided that it wasn’t what I wanted to do. I wanted this to be fun and a learning opportunity at the same time. I wanted to do more…most of the time…but had to stay focused on just learning some tools to help me become a librarian with an incredible skill set. I have to thank my students publicly because they were really good about trying out new things for me just to see if it worked.

Here is one of my pictures from this spring. It is pretty cool. No other reason for posting it except we all deserve good things for our hard work to learn Cool Tools from Polly.

What’s next? I will just keep on the journey of learning from others and learning from the hard intimidating projects that seemed overwhelming at times. I have a trail to follow that allows me to push forward to practice some new skills and share with others as I go. I will continue to use the skills I learned (some through trial and error).

What did I learn? I learned that if I try seven different projects at one time I will probably have fun or lose my mind. I learned that Somethings work great at my home computer and when I went to teach them to my students the technology was blocked. Students are willing to be test subjects for my new tech skills for food and bottled water. I learned that I like my pretty pictures.

One more thought before I share some of the things I learned is a line in a song from Cyndi Lauper “Girls just wanna have fun.” Actually I just want to have fun (during learning of course)(Yes that really is me).

Did I like learning this way? Yep. Actually I liked being able to see what others were doing and how they are using it. There were times when I was at the end of the road being frustrated but took a step back and realized that failing is learning to try things sometimes differently. Sometimes I needed a little help and reached out to others for their opinion and expertise. I have a direction that I want to go in for myself and my learning community.

I started out with Thing 19 Screen Casting and Screen Sharing. I was a bit nervous learning about it but more nervous about actual creating screen casts. I am a fan of Screen-Casto-Matic. It was very easy to use. I sent several “How to” videos to my students and staff on accessing the library, using Noodle Tools and Follett One Search. I ask teachers to put them in their Google Classroom for students to become familiar with ahead of meeting me in the library. I plan on doing more for other classes.

Presentation Tools Thing 7 was my next step. Haiku Deck is an easy way for students to present information visually and Haiku Deck already has photos to use without having to make sure that there are not any copyright issues. It’s fun and easy. I also used Google Slides with my own images just for fun.

Thing 20 Social Reading and Book Stuff turned out to be one of my favorites. I was able to make a BookFlix with over 90 slides of staff and student book reviews with pictures and looped it and sent it to students, staff, and administrators. It was cool. I included pictures people had sent me reading their books. I asked my principal if I could share about the results of the Staff versus Student Book Contest. I made up some certificates for the staff and gave them out during our meeting. When we talk to each other about books it is an awesome thing.

Thing 17 eBook Creation gave me the skills to create eBooks and have my students create them as well using Book Creator. It is engaging and brings out the student’s creativity.

Thing 18 Digital Literacy, Tattoos and Citizenship I almost did not do because I had done it before but after reading articles about it I knew I needed to update myself. It fit in quite well with the AASL Standards and it is important to be aware of what is around with Digital Stuff. Vicki Davis had a great article on what students needed to know (as well as adults).

Thing 10 Search Tools Ninja I learned about site specific searching from Kelly Walsh. I have been sharing this information with some other librarians doing projects and it makes life so much easier when students have the tools needed to research efficiently and effectively. Joyce Valenza wrote about “ “Peripheral vision” which is finding information from the results of a search. Students find other information within their searches and modify their searches. There was so much information about searching for information I kept on getting sidetracked.

Thing 8 Digital Curation: The article, Are you a curator or a dumper? by Jennifer Gonzalez was the best one of all the things. eLink.io is the best curation tool I have used.

Thing 26 Media Skills: Collage Maker Be Funky is an amazing tool to create collages. Much easier than sending pictures to Walmart for Christmas Collage presents. There were so many ideas about having students use images in the library like creating a Mission Wall and have students put stuff about themselves on it. I think the students probably have enough selfies to create posts for the entire year just by sharing what they are reading, what is important to them and it gives me a chance to know my students better. Students use photos all of the time so now we can start incorporating them into their learning.

Thing 22: Teaching & Learning with Primary Sources was the timeliest thing I did. I just was at a conference about it and it is hard to stop myself from searching everything. I learned about the Green Book Movie from one of my students and realized people used the Green Book when they travelled. As I was getting more interested in finding primary resources for my students they also started looking for different things for a history project. I truly believe that some of my students are hooked on primary documents. I have a teacher that will be coming into the library for an end of the year project with her students using primary documents to create a timeline from 1980- 2009. The students will look at the primary documents and learn about history, culture, social and political information of the time. My goal is to find the coolest primary documents that will get the students wanting to learn more.

Thing 24 Google Drawing: It is a fun project. I used Google Drawing to create a Infographic about Genres. Honestly it was much nicer looking than the one I printed on my color printer. I know I already said I had a favorite program to use but if you are artistically challenged like me Google Autodraw is the best way to draw a picture on the computer and have Google guess what you want it to look like then all you do is choose the suggested pictures you want. Try it…it’s awesome. Oh and use The Noun Project too.

Thing 24 Google Drawing

I have been reading several articles throughout the school in Ditch That Textbook. Our assistant principal sends some very useful information from that site by Matt Miller I am a fan of infographics. I think it is a quick way to give out information to students and since I hang them up students can always refer to them. This will be my first time actually creating one from scratch. Hopefully I can use them with my students for writing projects as Miller suggests. He also writes about how students need to gather information, summarize it and then present it. I agree with him because writing does not always have to be in sentences. The information students curate and share can be seen in the virtual world as well as on poster boards. The infographics need to be visually appealing. They need structure and color. The focus according to Miller is to bring the reader to see the content. We want our students to share the important facts. Miller also posted about copyright. It is just like a mini lesson we would do with our students before researching, especially when it comes to images. 14 copyright essentials teachers and students must know is also part of Miller’s Ditch that Textbook. Using Creative Commons Licensing is also a very useful tool. I learned a lot about reading the symbols used in Creative Commons which I did not totally know about before reading the licences. I thought it could be a good visual tool to use so I searched for CC infographics and found many so I won’t have create one of my own (no worries, I will follow the CC guidelines for using it). So now I can use Google Drawing to create something of my own.

Back to my topic…

Realistically how often have we helped students with essays or papers where they are just throwing in “stuff” just to fill up the page. Just because students find good information for papers it does not mean that they are actually learning anything from writing the research paper.

INFOGRAPHIC Created using Google Drawing: Color Code Genres
I am creating a Infographic using google Drawing for signs around my library for different color coded genres.I signed up for TheNounProject for my images. It is easy to use but I am having trouble finding the right image for my realistic fiction icon. But the thing is just to find one that my students will understand.

The first image is what I printed out on my color printer back in January when we started to color code genres. The second image that really looks better…since I just learned how to use Google Drawing.

The infographics can be printed and hung up around the classroom. Maybe I can get some students to do some basic ones for different ways to use the library. I plan on having the students use regular images from different photo/image sites like CC, Canva and Morgue Files and I will also direct them to use The Noun Project. I will also share this with my teachers to show them how life can be more functional for them and look pretty at the same time.

Google Drawing will help my student conceptualize ideas and information into a visual piece to be shared in print or virtually. I think with the other links to images it will be easy for them to share projects that do not have to be essays or papers. The student’s can learn how to take an idea and put it into Google Drawing to demonstrate knowledge of the topic.

I like what Meredith Akers did with creating her “Brain Dump.” She also shares the template. It’s a great way to be visual – she has terrific graphics using Google Slides to create a project about 3D shapes and the process of learning. People should definitely check out her blog to use or just to see the creativity that is available through using different tools.

Another thing I explored was the Recovering the Classics. I think I can make this a contest for the students and hopefully involve the ELA and Art departments. I think there are so many different possibilities for this. This definitely will be a future project for me.

Google AutoDraw
This is a blast. I’m using it to demonstrate my drawing prowess to random students coming into the library. It is a great conversation starter for me to chat with students. They already roll their eyes when I tell them I have something new for them to try so showing them some drawings is fun.

Thing 22: Teaching & Learning with Primary Sources

Thing 22: Teaching & Learning with Primary Sources

This is a very timely topic for me since I just attended a conference on Using Primary Documents in the Classroom by Librarian Maureen King. The web page on by the Library of Congress (LOC) is a great place to start learning the reasons why we need to use primary documents in teaching. The reasons for using primary documents listed in the LOC goes perfectly with the new AASL Standards Framework. It’s great that we have these resources already in place for us to use to incorporate the standards into our own curriculum. It is about student engagement, inquiry, and critical thinking skills. One activity that we did during this conference was to look at different pictures and think about what it was and the purpose for the image. I plan on giving my History students images of the time periods they are learning about to get them more interested in learning about a topic like the 1920’s for example. I want to give my students pictures of flappers, musicians, athletes, politicians and gangsters. It is my goal to entice students to learn about a topic during the 1920’s and become authors (and experts) to write about it in a 1920’s Time Magazine.

Another fantastic resources on using primary documents is Engaging Students with Primary Sources. This is a PDF that has a table of contents that using one click and it takes you exactly where you want to go. There is a list of strengths and weaknesses on different types of documents and how to analyze the documents. This is the most worthwhile reading on using primary documents that I have used.In their bibliography they also list Web Sites Featuring Primary Sources pages 62- 63. If I had to choose only one source for using primary sources Engaging Students with Primary Sources would be the top pick.

One issue that faces my students and many others is the fact that many document are written in cursive so they need some help with reading them. The other problem is that some of these documents are very old and hard to read because the ink and paper have broken down. However, on the other side if we continue to search we can find documents , images, maps and a whole lot of other information that is very usable.

As I explain primary and secondary documents to my students they always ask me if it can count as a”print” source. They get caught up in how many print sources they need according to their teacher and don’t recognize that reading the actual Green Book or the Letter for the Medal of Honor are actual written documents that have been digitized.

Today I was working with American History students on a project of Historicizing a Film. One student was researching the movie Green Book.I never heard of this movie before today. In Thing 22 there is actually a website that is the digital version of the Green Book.

NYDPL The Green Book. The Green Book was Dated 1936 – 1967 by Publisher: Victor H. Green & Company that was a guidebook for African Americans to travel safely and listed African American “friendly” places. The book actually contains places to eat, to lodge and even recreation. My students will use these documents to analyze the historical content in the movie and compare it to actual events.

Here is one on Ruby Bridges found on Civil Rights Digital Library that I didn’t know existed. We were finding information in databases but decided to think outside the box for more information. We found many resources about Ruby Bridges on Digital Public Library of America. My students are actually getting interested in seeing first hand what was really happening during different historical eras and seeing the differences that were created in order to make movies.

This is really the first time I have used primary documents as part of a lesson and I am able to show my students how valuable they are. The part that is difficult is teaching them how to cite the source for their works cited page. Honestly I do not have the experience on citing primary sources so I found this link from the LOC on how to Citing Primary Sources

Hacksaw Ridge – Richard Doss this is basic information though not a primary source but the next link is the actual letter of approval for Richard Doss to get his Medal of Honor.
Richard Doss Approval for Medal of Honor Fortunately this document was typed and not written in cursive.

So, I plan on showing some students how to use primary for the last projects I am working on this year but I plan on introducing them to more students next year so I can plan a more strategic lesson to incorporate them into my curriculum and align them with the AASL Standards.

Thing 26 Media Skills

Thing 26 Media Skills

I was not sure where to start with this project so I first looked at “9 Ways Classroom Photos Can Create Student Connection”
Your smartphone may be the secret to classroom community (selfie stick optional).
By Jenn Horton on May 22, 2018
I liked her ideas about having students contribute images of themselves to a spot in the library. She changes up the manner in which she displays the student’s photos. She has walls, doors and windows. It is important that we as educators make a connection with our students. I think I will use from Horton’s article is to create a “Mission Wall” where students post their picture, a title that is an attribute about themselves and a quote or mission. I currently have lots of student’s artwork all over my library including the ones they create and just tape on our circulation counter or sometimes on our computers. I want to start the next school year off with this Mission wall to make my students feel included and important. The second thing I do occasionally during our staff vs. student book contest is to hang pictures of both staff and students reading. However I want to extend the reading pictures from the start of the school year instead of just from our book contest.

I used Collage Maker BeFunky for pictures from the faculty for our staff vs. student reading contest.

Picting, not Writing, is the Literacy of Today’s Youth Is a picture really worth 1,000 words?
By Cathie Norris, Elliot Soloway 05/08/17
This viewpoint by Norris does raise some valuable concerns about how our students are communicating in the real world. The usage of Snapchat is people communicating not by texting or email but simply through pictures. According to Norris students are telling a story by using Snapchat or other similar programs.

I think she has a valid point about communicating to others. I took a moment to look at the texts on my phone and they are not all in words. I have pictures, videos and memes that I have both sent and received without any words. So we do tell stories through our own pictures. So I am going to think more about the “Picture Literacy.” Pictures can also be a jumping point for writing especially when they are relevant to the students. I’m not going all in on just pictures as a form of literacy but just as another form learning.

I love Collage Maker BeFunky because it doesn’t cut off my images like when I send my collages to Walmart. BeFunky allows saving into drive and also the option to download. I tried it with some pretty pictures I had.

Students will be able to create collages with their own pictures for fun. Once they are hooked on the coolness of it I am hoping they will use it to create visual presentations for projects. This will be a great lesson to teach about what images can be used from the Internet so students will be able to use the Public Domain Images and Music in my Follett Collection

Media skills can be challenging when the programs that I wanted to use worked fine until the pay for this eventually showed up. But I use free versions for many projects and they seem to work fine. Collage Maker allows text and styles so it is useful for my students and myself. It also saves to Google Drive and downloads the collages.

Thing 8 Digital Curation

Thing 8 Digital Curation

Curation Situations: Let us count the ways July 5, 2017 By Joyce Valenza
I think that Joyce Valenza has some good ideas on the purpose of curating is collaboration as well as just putting a digital collection together. We build with our teachers that enables our students build knowledge. We need diverse collections that will also allow our students to become curators themselves, which is a integral part of the AASL Standards. Valenza and others have also talked about using OER Sources into our curations.

Are you a curator or a dumper? by Jennifer Gonzalez made me laugh because I know I do it and because we are librarians we want to share relevant information to others but often we fall short by “dumping” to much on a person and they immediately go into information overload because people can only process small chunks at a time.

My own thoughts on the Curator or Dumper…
This information overload is probably an issue that librarians cultivate , don’t hate me yet, but it’s just part of who we are. If you ask me about one book to read; you will hear about 10 books and all the ways I can book talk them to you. Ask me about why cows lay down when bad weather is coming and I will call Cornell Cooperative Extension, give you my neighbors phone nume who is actually a farmer as well as 13 books on Fact or Fiction in the animal industry, and it won’t stop there. I will email you peer reviewed articles and send you some incredible links to NOAA and actually will call my friend Bob at the news station who is a meteorologist and ask him about his point of view. By this time the person I am giving this information has spun their head around twice in both directions, asked for duct tape for my mouth and stared at me as if I really gave them too much information (like I would actually do that). Basically it comes down to asking questions about the specific information needs of a person and going from there with a plan to meet only those needs i order to curate efficiently. Don’t feel bad about being an information dumper; there are programs to change that. We can become super curators meeting the intellectual, emotional and amusing needs of our patrons.

Curation Tools
I tried Symbaloo but it would not be readily used by my students. I tried it before as a curation tool and it is only okay. I signed up for it again and for me it is too cluttered. I work better without having lots of things on my screen at one time. I could see some of my students using it to create their own resource lists to share with other students. Teaching curation is a skill that the students do need to learn. I would show my students two or three curation sites and let them choose But I am moving on in search of other tools.

I use Smore online flyer to share information to my students and one for my faculty. I limit how much information I put in it and I try to keep the focus on one or two topics. This seems to work well especially when I have something new such as Follett OneSearch to teach people.

The last program that I will try is elink.io which seems to be a cross between Smore online flyer and Google sites. This is a great Chrome Extension. When I needed to save a web page for elinkio I simply clicked the button and it also gave me opportunities to take a screenshot or to use an existing image for the web page. This can also be sent as a newsletter. I curated a page for LGBTQ+ students. I tried to include different media formats, eBooks and books and used local authors and people to help make connections for LGBTQ+.. I think I could easily teach elink to my students when they are collaborating on projects and because there needs to be more than just a works cited page for information. This curation and sharing will help my students find more meaningful information because they will be sharing it with each other whereas a works cited page is usually just seen by the teacher.
Here is my example of using elink.io
LGBTQ+

Thing 10 Search Tools Ninja

Search Tool Ninja Thing 10
Best web site to teach stealthy Ninja like skills is from Queensborough Community College. It is a LibGuide simply named Google Fu

Teach Students to Search Like a Boss With These 5 Easy Google Advanced Search Tips
Kelly Walsh
I learned about site specific searching which my students will be using other than just going out to Google Land. Another new thing was searching file types

Key ideas
“Use Quotes” – Narrows topics This is also what we teach students how to search databases for more accurate information. Using advanced searching or Boolean searching in databases helps to limit: type of resources, time period, and keyword searching allows students to spend less time searching and more time reading the article they retrieved.
Site Specific – narrows searches to specific sites like gov, edu, org and if you put free in quotes it will come up with free stuff from that site (that’s cool)
File Types – this is especially useful when I know something I had seen before and want to find again because I did not bookmark it like a pdf or a image type.
Image Search- this is great especially when I use reverse image search to find an image
Google Advanced Search- This is very similar to the advance searching in databases. My students and teachers are learning about Google Scholar for specific credible information.

“Some secret strategies for serious searchers”
Joyce Valenza
October 29, 2017 By Joyce Valenza
School Library Journal

This article by Joyce Valenza was loaded with information some of it I have been using with my students but didn’t know it had a name to it. “Peripheral vision “ is simply using more search terms as you are looking for information. I tell my students when they come across a different search term to write it down because that is another way to find what they are looking for. It leads us to other places that we might not have looked for information. So I will put that term up on my wall of information locating. One other thing that I will share with my students again is the term chaining that Joyce describes as using the list of references that already exist on a document. Sometimes this is challenging for students because some of the citations are books and we do not have access to them. Over all this article really is a great reminder to be mindful of when we are searching.

One other resources for me about Google searching came from a local college Jamey Thompson professor at HVCC that willing shared his Technology Slides with me about Google Fu with me with permission to share it with others. He learned about LibGuides and found out about it at Queensborough Community College and this is the link to Google FU.
Google Fu is what I use with some of my students. Becoming a search tool ninja takes lots of practice including breaking some of our own bad habits…I will admit I when I want some quick information sometimes I actually type in a question.

Here is another site I have used. It has a tremendous amount of search techniques. Some are similar to what I have read about already but just wanted to share this. Advanced Google Searching

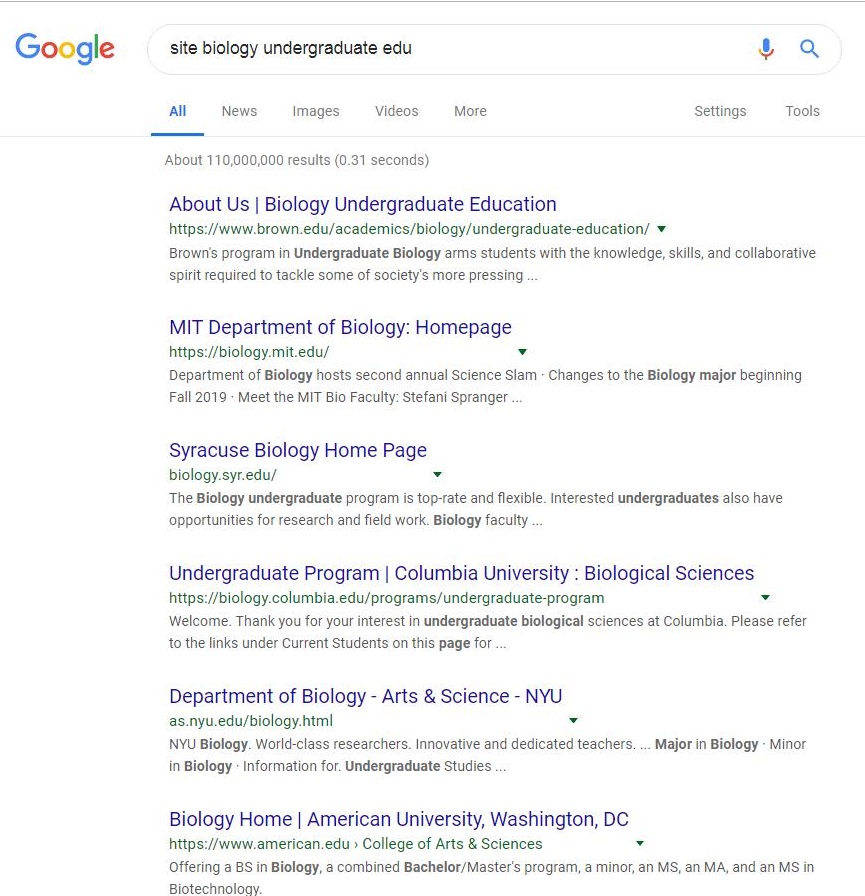
So I already started using site specific search while helping a colleague prepping for his students to research a career and locating 3 colleges that they could go to.
First I started site biology edu
Second try site biology undergraduate edu
Third try was site biology college edu
Hopefully from these pictures you can see the differences in search results


The Internet Way Back Machine is a fun place to just go and search and explore.

Thing 11 Digital Literacy, Tattoos and Citizenship

Since I first posted about this topic in 2014 access to technology and ethical/non-ethical use has changed drastically. I originally created a web page for parents and students on Digital Tattoos and Citizenship. I want to expand upon that and include Digital Literacy. The inclusion of digital literacy is key concept in the AASL Standards: Engage 6: B and 6: C. I plan on creating something that is easily understood by all stakeholders.
Recently I attended a conference with school librarians, teachers and academic librarians. One major point of discussion was about digital literacy and the skills our students need to be college ready. At another meeting with other educators in my district we talked about digital literacy. Many of them thought our students were digital literate. So now it has become my quest to enlighten the masses of students and adults about digital citizenship and literacy.
I read “What Your Students Really Need to Know About Digital Citizenship Ideas on how to guide students to the knowledge and experience they need to act responsibly online.” by Vicki Davis. She talked about the “9 Key of Ps” of digital citizenship. I thought two of them were very interesting and informative. Property – understanding copyright including my all-time favorite just citing Google as a source. I have posters on my walls that say Google is a search engine not a source. The other one of Davis’s keys was Permission – how to get permission to use information and cite it. She, like many other authors, also referred to Creative Commons and Common Sense Education to learn more about this. I’m working with teachers to have students use Noodle Tools to help them with citing but I still correct work cited pages that simply list urls.
Another good article on this topic is “What are the Top 5 Ed Tech Trends This Year? ISTE Has the Answer,” contributor Adam Shapiro. One topic in the article is Redefining Digital Citizenship Digital citizenship is no longer about just social media and staying safe online. It is more about teaching students and adults about using technology in a wider arena. What we do in our own learning communities can have a positive impact in the global community; therefore becoming true digital citizens.
So this is where I begin. After reading the above articles and going to Common Sense Media and Creative Commons I have decide to create an updated collection of digital citizenship, literacy and footprints. But for the moment I will simply focus on one topic on digital citizenship since it has grown over the last few years to not only include internet safety but also the use of information and technology tools.

As I was researching different sources of information on digital citizenship I kept on finding information that could be used for citizenship, literacy and footprints so I created a collection in Follett that has three separate collections addressing the digital issues.

Digital Literacy Basics

This collection Includes:

Digital Literacy Tools, Apps and Programs – Knowledge about: Google Tools, Presentation Tools, Collaborative Tools,  Creation Tools

Digital Literacy – Citations, Fake News, Web Site Evaluation, Smart Searching

Digital Common Sense for Students and Parents- Harmful Apps, Social Media Effects Future, Skills Teens Must Learn, Devices

Thing 17 eBook Creation

I never really thought that creating eBooks would be so easy. I looked at several of them trying to keep in mind the projects my students work on and how they could incorporate them into sharing what they learned.
Story Jumper was cute but not really for my High School students. The one program that I can use for all of my students is Book Creator. So far I have used it with my American History class that created a 1920’s Time Magazine. The students got to write about political, social, cultural, law and inventions during a specific year. They worked in groups to in Google docs to share what they learned.
I made a very simple example for them to try using Book Creator.
Here is my example:Times Magazine Example

This example took less than five minutes just as a brief guide to the highlights of the program.
Look What I Can Do and So Can You

Here is one I worked with my students on after they put the magazine into Google docs.
1925 Student Issue Time Magazine

I showed some English teachers the simplicity of using the program so next time instead of creating brochures or posters their presentation will be by using Book Creator. Book Creator like other eBook programs reads the text to students. There really is not much of a learning curve using Book Creator. They have some excellent how to videos and many different ideas for using them in the classroom. When creating a book there are so many options such as: cool page backgrounds, fonts and text sizes, images, media, (you can also record), it has a comic style layout, and shapes just to name a few. The book can be shared, downloaded as an eBook (ePub) and can have collaborators. I personally would recommend Book Creator to librarians and teachers of all grades because of the flexibility and ease of use. Besides …it looks good.

Thing 20 Social Reading and Book Stuff

I am in the process of having a “Staff vs. Student” book contest. I decided to use Google Forms to gather information. I tried something similar but I was using sticky notes to post on my display. So this time I am just going to do it electronically. I came across a couple of websites with book sharing through a “BookFlix” theme. I will be using this to share the results and it includes student selection and staff selections. Once I loop it in Google Slides it will have the books, student and staff reviews and part of this reading contest is to include a selfie of the reader and the book. In order to promote this more we have the books displayed in the library window display case so others can borrow the book. I found the best way to get others to read is to have students or staff share what they are reading so we create an Reading Environment. My book share is being sent to all faculty and students and is being played in teachers rooms.

HHS Student v Staff Book Contest 2019

These are the links to Jane Hill who posted the Bookflix on Twitter and Phil Robertson who freely shared his Google Slides from which I added to and created my own version.
Jane Hill

Phil Robertson

The article “It Takes a Reader to Grow a Reader: When Adults Don’t Read Kids lose by LaGarde and Nelson basically is what I am trying to do.I want students to have access to read and hopefully become strong independent readers. Adults need to be the role models that is one reason I started the staff v student book contest. More student and faculty can be seen with a book nearby that they are reading. This article also talks about listening to books is the same as reading books. I happen to agree with that statement. Skills necessary to listen/read to comprehend are extremely similar. I attended a Donalyn Miller conference and she also talked about the necessity of having books available to student to improve reading.

International Children’s Digital Library IDLC has books from many diverse cultures. I am sharing IDLC with my Social Studies and ENL teachers and because it has such a wide range of books I am sharing it with everyone including the students. It is easy to access and that to me is important because students need to have books around them so they will read. If students don’t have easy access to books whether electronically or physically the chances of them becoming readers diminishes.

Thing 7 Presentation Tools

I have tried various presentation tools in the past. One thing I recently learned was that I really need to focus on my audience and what it is I am trying to present. Presenting information to my students is totally different than presenting Follett One Search to my BOE to show them how One Search relates to the standards.

I recently learned about Haiku Deck. The best part of using it is that the images that are available are free to use without any copyright issues. It even lists the presentation outline. I opted for the free version but would like to be able to down load the decks as well as have control over privacy and make it into a video. Haiku Deck makes it so easy to be creative.

Since this lesson allowed me to have some fun I decided to see if my students understood the images I used for each idea I had. Some thought I was a bit crazy but others got the humor.

I wanted to use Google Slides for my comparative learning experience on presentation tools. I started it by looking through LibreStock which I thought was a good search engine except it does come up with Shutter Stock photos which I find annoying and try to tell my students to find other images without a company logo on the image. Many of the sites come up with the Shutter Stock images so it’s really about doing a little more specific search which leads to teaching students a lesson on how to search for images. Photos for Class are really cool because when the images are downloaded the citation is included.

Ok so now I strayed a bit from my original focus. I learned how Google Slides can be used not only for a PowerPoint type of presentation but it can also be shared with others as an actual show. Google slides has some cool features to it such as diagrams, voice type speaker notes (I didn’t know it did that), and can use add –ons such as of Lucid Charts but also a great math add – on Math Equations.
Another aside- Slides Carnival is also cool because of the presentation style it’s amazing and hopefully once I learn how to use it proficiently I will be able to share it with my students.

Back to my project…I used Google Slides and made the exact presentation as the Haiku Deck but I used my own images. I wanted to see how they compared such as ease of use for me and what would work better for my students using it. I think Haiku Deck is very easy and it might help the students that overload information into Slides. But whatever my student end up using The need to learn how to present, how to use a programs with just enough information and know their audience.

My two examples are for my students on the exact same topic. They do seem to like the Haiku Deck presentation because it is easy to use.
Haiku Deck https://haikudeck.com/p/ea97efe121

Google Slides https://docs.google.com/presentation/d/e/2PACX-1vQRwYdcLJ9DNC2XQtNPO7ORdhcbn8MIOKoQod4B0P51ig_Q6a-oHfcBfOorVoaaJU8pMXJUa1tpn2QQ/pub?start=true&loop=true&delayms=5000